South Eastern Freeway
| South Eastern Freeway South Australia |
|
|---|---|
 |
|
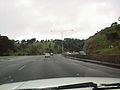
| The highway viewed near the eastern portal of the Heysen Tunnels | |
| General information | |
| Type | Freeway |
| Length | 76 km (47 mi) |
| Opened | 1967 |
| Route number(s) | |
| Former route number |
|
| Major junctions | |
| West end |
|
|
|
| East end | |
| Location(s) | |
| Major suburbs / towns | Crafers, Adelaide, Stirling, Bridgewater, Hahndorf, Mount Barker, Callington, Monarto |
| Highway system | |
The South Eastern Freeway (previously signposted as Princes Highway) is a 76 kilometre controlled-access highway in South Australia. It carries traffic over the Adelaide Hills between Adelaide and the River Murray, near Murray Bridge, connecting via the Swanport Bridge to the Dukes Highway which is the main road route to Victoria. It is often referred to by South Australians simply as the Freeway, as it was the first freeway in South Australia, and is still the longest, and the only one with "Freeway" in its name rather than "Expressway" or "Highway". It is a part of the National Highway network linking the state capital cities Adelaide to Melbourne and signed as National Highway M1. The South Eastern Freeway includes 500-metre-long twin-tube tunnels (the Heysen Tunnels) in the descent towards Adelaide, the first of their kind on the National Highway. It is designated as the M1.
Contents
Structure[edit]
The South Eastern Freeway features 6 lanes of traffic, arrester beds and concrete median barriers, with street lighting between Glen Osmond and Crafers. The remainder of the length to the Swanport Bridge is dual carriageways with two lanes in each direction.
History[edit]
Prior to the initial construction of the freeway in the 1960s, all inbound and outbound road traffic between Adelaide and south-eastern South Australia and Victoria had to travel on a two-lane highway originally built in the early part of the 20th century. With growth in Adelaide's population issues of congestion and safety mandated reconstruction. Studies began in 1962 for a freeway commencing from Crafers, that endpoint selected arguably due to the massive expenditure required with the precedent upgrade of the Mount Barker Road.
Road construction began in 1965 from Crafers and the first stage of eastbound traffic lanes were opened in 1967, the first westbound section in 1969. The freeway was opened in stages as construction progressed. The final section bypassing the town of Murray Bridge and connecting to the new Swanport Bridge over the River Murray opened in 1979, replacing the historic bridge in the town for through traffic.
The opening of the freeway resulted in the less direct Bridgewater railway line losing patronage,[citation needed] and the line eventually closed to passengers in 1987.
The Adelaide–Crafers Highway extension came as a much-needed upgrade and replacement to the previous link road, the Mount Barker Road,[1] which had been contoured to the Adelaide Hills, giving rise to many steep turns, ascending a tortuous route. The tightest hairpin turn on the Mount Barker Road became infamous as 'the Devils Elbow', often the site of car and semi-trailer accidents.
On 16 May 1995, Prime Minister Paul Keating announced the construction of the new Adelaide-Crafers section. The Heysen Tunnels, named after well-known South Australian artist and benefactor Hans Heysen, were completed in 1998. Construction was completed early 2000 and on 5 March 2000 Prime Minister John Howard opened the new road.[2] It was the largest South Australian road project at that time, costing a total of A$151 million, wholly funded by the Australian Federal Government.

An additional exit was built at Monarto around 1999 to service an expanding commercial zone and Monarto Zoo in the area.[3] Another exit was announced in 2014 at Bald Hills Road 4 km southeast of the Mount Barker interchange to service growing housing estates in southern Mount Barker and Nairne.[4][5] The contract was announced on 1 April 2015 that Bardavcol would commence construction in May 2015, with the interchange including entry and exit ramps in both directions opening in mid-2016. The $27M project was funded $16M by the Australian government, $8M from South Australia and $3M from Mount Barker district council.[6] The new interchange opened on 15 August 2016.[7]
The Freeway bypasses many towns previously along the Princes Highway including
Road safety[edit]
Shortly after the Adelaide-Crafers section opened, several incidents involving semi-trailers drew media attention to the road. While the previous Mount Barker Road was a notorious stretch, its dangers were well known; the new freeway presented the new challenge of a sustained continuous gradient with traffic lights at the bottom. Heavy vehicles with inadequate braking found it hard to slow down once they had exceeded a certain speed; this was made worse with brake failures. It took some time, and the addition of several warning signs prior to the descent, for heavy vehicles to become familiar with the freeway's characteristics. Semi-trailers can be seen travelling as slow as 20–30 km/h downhill. In 2005 changeable electronic road signs were installed every 200 metres, so that the speed limit of the road can be adjusted from Transport SA headquarters in Adelaide. This has both improved safety for commuters, and emergency service workers like the Country Fire Service.
In 2010 and 2011, after more incidents involving trucks having problems successfully braking down the hill, including one going into a bus stop, and another going straight through the intersection at the bottom, the government added new laws that any vehicle with 5 axles or more must stay in the left lane and must not exceed a 60 km/h limit from the interchange at Crafers to the old tollhouse. More Safety cameras are installed in an attempt to ensure trucks abide by this new limit.
Additional signs for the two arrester beds on the descent have also been added, to encourage out of control drivers to use them as a safer alternative.
In August 2014, another truck collided with many cars at the lower part of the highway, killing two people. Brake failure was suspected to be the cause of the accident.[8]
Connections[edit]
The Adelaide end of the South Eastern Freeway leads downhill to traffic lights at the intersection of Glen Osmond Road which continues northwest as route number A1 into the Adelaide city centre, Portrush Road which carries the National Highway designation (as A17) north to bypass the city and towards Port Adelaide, and Cross Road which leads west towards the southern suburbs of Adelaide.
The southeastern end of the freeway, near Murray Bridge feeds onto the Swanport Bridge, a two-lane, 1-kilometre-long (0.62 mi) bridge over the River Murray, where it joins the Princes Highway, a dual-carriageway highway to Tailem Bend. At this point, Highway 1 becomes a two-laned, two-way scenic route which passes through many coastal towns of South Australia and Victoria. The National Highway continues to Melbourne as the Dukes Highway (A8) from Tailem Bend to the Victorian border and beyond as the Western Highway.
Exits and intersections[edit]
| Route diagram | |||||||||||||||||||||||||||||||||||||||||||||||||||||||||||||||||||||||||||||||||||||||||||||||||||||||||||||||||||||||||||||||||||||||||||||||||||||||||||||||||||||||||||||||||||||||||||||||||||||||||||||||||||||||||||||||||||||||||||||||||||||||||||||||||||||||||||||||||||||||||||||||||||||||||||||||||||||||||||||||||||||||||||||||||||||||||||||||||||||||||||||||||||||||||||||||||||||||||||||||||||||||||||||||||||||||||||||||||||||||||||||||||||||||||||||||||||||||||||||||||||||||||||||||||||||||||||||||||||||||||||||||||||||||||||||||||||||||||||||||||||||||||||||||||||||||||||||||||||||||||||||||||||||||||||||||||||||||||||||||||||||||||||||||||||||||||||||||||||||||||||||||||||||||||||||||||||||||||||||||||||||||||||||||||||||||||||||||||||||||||||||||||||||||||||||||||||||||||||||||||||||||||||||||||||||||||||||||||||||||||||||||||||||||||||||||||||||||||||||||||||||||||||||||||||||||||||||||||||||||||||||||||||||||||||||||||||||||||||||
|---|---|---|---|---|---|---|---|---|---|---|---|---|---|---|---|---|---|---|---|---|---|---|---|---|---|---|---|---|---|---|---|---|---|---|---|---|---|---|---|---|---|---|---|---|---|---|---|---|---|---|---|---|---|---|---|---|---|---|---|---|---|---|---|---|---|---|---|---|---|---|---|---|---|---|---|---|---|---|---|---|---|---|---|---|---|---|---|---|---|---|---|---|---|---|---|---|---|---|---|---|---|---|---|---|---|---|---|---|---|---|---|---|---|---|---|---|---|---|---|---|---|---|---|---|---|---|---|---|---|---|---|---|---|---|---|---|---|---|---|---|---|---|---|---|---|---|---|---|---|---|---|---|---|---|---|---|---|---|---|---|---|---|---|---|---|---|---|---|---|---|---|---|---|---|---|---|---|---|---|---|---|---|---|---|---|---|---|---|---|---|---|---|---|---|---|---|---|---|---|---|---|---|---|---|---|---|---|---|---|---|---|---|---|---|---|---|---|---|---|---|---|---|---|---|---|---|---|---|---|---|---|---|---|---|---|---|---|---|---|---|---|---|---|---|---|---|---|---|---|---|---|---|---|---|---|---|---|---|---|---|---|---|---|---|---|---|---|---|---|---|---|---|---|---|---|---|---|---|---|---|---|---|---|---|---|---|---|---|---|---|---|---|---|---|---|---|---|---|---|---|---|---|---|---|---|---|---|---|---|---|---|---|---|---|---|---|---|---|---|---|---|---|---|---|---|---|---|---|---|---|---|---|---|---|---|---|---|---|---|---|---|---|---|---|---|---|---|---|---|---|---|---|---|---|---|---|---|---|---|---|---|---|---|---|---|---|---|---|---|---|---|---|---|---|---|---|---|---|---|---|---|---|---|---|---|---|---|---|---|---|---|---|---|---|---|---|---|---|---|---|---|---|---|---|---|---|---|---|---|---|---|---|---|---|---|---|---|---|---|---|---|---|---|---|---|---|---|---|---|---|---|---|---|---|---|---|---|---|---|---|---|---|---|---|---|---|---|---|---|---|---|---|---|---|---|---|---|---|---|---|---|---|---|---|---|---|---|---|---|---|---|---|---|---|---|---|---|---|---|---|---|---|---|---|---|---|---|---|---|---|---|---|---|---|---|---|---|---|---|---|---|---|---|---|---|---|---|---|---|---|---|---|---|---|---|---|---|---|---|---|---|---|---|---|---|---|---|---|---|---|---|---|---|---|---|---|---|---|---|---|---|---|---|---|---|---|---|---|---|---|---|---|---|---|---|---|---|---|---|---|---|---|---|---|---|---|---|---|---|---|---|---|---|---|---|---|---|---|---|---|---|---|---|---|---|---|---|---|---|---|---|---|---|---|---|---|---|---|---|---|---|---|---|---|---|---|---|---|---|---|---|---|---|---|---|---|---|---|---|---|---|---|---|---|---|---|---|---|---|---|---|---|---|---|---|---|---|---|---|---|---|---|---|---|---|---|---|---|---|---|---|---|---|---|---|---|---|---|---|---|---|---|---|---|---|---|---|---|---|---|---|---|---|---|---|---|---|---|---|---|---|---|---|---|---|---|---|---|---|---|---|---|---|---|---|---|---|---|---|---|---|---|---|---|---|---|---|---|---|---|---|---|---|---|---|---|---|---|---|---|---|---|---|---|---|---|---|---|---|---|---|---|---|---|---|---|---|---|---|---|---|---|---|---|---|---|---|---|---|---|---|---|---|---|---|---|---|---|---|---|---|---|---|---|---|---|---|---|---|---|---|---|---|---|---|---|---|---|---|---|---|---|---|---|---|---|---|---|---|---|---|---|---|---|---|---|---|---|---|---|---|---|---|---|---|---|---|---|---|---|---|---|---|---|---|---|---|---|---|---|---|---|---|---|---|---|---|---|---|---|---|---|---|---|---|---|---|---|---|---|---|---|---|---|---|---|---|---|---|---|---|---|---|---|---|---|---|---|---|---|---|---|---|---|---|---|---|---|---|---|---|---|---|---|---|---|---|---|---|---|---|---|---|---|---|---|---|---|---|---|---|---|---|---|---|---|---|---|---|---|---|---|---|---|---|---|---|---|---|---|---|---|---|---|---|---|---|---|---|---|---|---|---|---|---|---|---|---|---|---|---|---|---|---|---|---|---|---|---|---|---|---|---|---|---|---|---|---|---|---|---|---|---|---|---|---|---|
|
|||||||||||||||||||||||||||||||||||||||||||||||||||||||||||||||||||||||||||||||||||||||||||||||||||||||||||||||||||||||||||||||||||||||||||||||||||||||||||||||||||||||||||||||||||||||||||||||||||||||||||||||||||||||||||||||||||||||||||||||||||||||||||||||||||||||||||||||||||||||||||||||||||||||||||||||||||||||||||||||||||||||||||||||||||||||||||||||||||||||||||||||||||||||||||||||||||||||||||||||||||||||||||||||||||||||||||||||||||||||||||||||||||||||||||||||||||||||||||||||||||||||||||||||||||||||||||||||||||||||||||||||||||||||||||||||||||||||||||||||||||||||||||||||||||||||||||||||||||||||||||||||||||||||||||||||||||||||||||||||||||||||||||||||||||||||||||||||||||||||||||||||||||||||||||||||||||||||||||||||||||||||||||||||||||||||||||||||||||||||||||||||||||||||||||||||||||||||||||||||||||||||||||||||||||||||||||||||||||||||||||||||||||||||||||||||||||||||||||||||||||||||||||||||||||||||||||||||||||||||||||||||||||||||||||||||||||||||||||||
| LGA | Location | km[9] | mi | Destinations | Notes |
|---|---|---|---|---|---|
| Burnside–Unley–Mitcham tripoint | Glen Osmond–Urrbrae–Myrtle Bank tripoint | 0 | 0.0 | North-western highway terminus at traffic lights | |
| Burnside–Mitcham | Mount Osmond, Leawood Gardens | 2.2 | 1.4 | Mount Osmond Road – Mount Osmond | Four ramp parclo interchange |
| Leawood Gardens | 2.8– 3.2 |
1.7– 2.0 |
Mount Barker Road – Eagle On The Hill | South-eastbound exit and north-westbound entry only; location of the Devils Elbow on Mount Barker Road | |
| Burnside | 4.1 | 2.5 | Heysen Tunnels northern portal | ||
| Adelaide Hills | Crafers West | 4.6 | 2.9 | Heysen Tunnels southern portal | |
| 6.7 | 4.2 | Mount Barker Road – Eagle On The Hill | North-westbound exit and south-eastbound entry only | ||
| Crafers | 8.0 | 5.0 | Mount Lofty Summit Road – Crafers, Mount Lofty / Waverley Ridge Road | [10] | |
| Stirling | 9.2 | 5.7 | |||
| Bridgewater | 13.8 | 8.6 | Carey Gully Road – Bridgewater | ||
| 15 | 9.3 | Adelaide-Wolseley railway line | |||
| Verdun | 16.8 | 10.4 | ramps to/from Adelaide only | ||
| Mount Barker | Mount Barker, Littlehampton, Totness | 25 | 16 | ||
| Mount Barker, Littlehampton | 26 | 16 | Victor Harbor railway line | ||
| Mount Barker, Blakiston, Nairne | 29 | 18 | Bald Hills Road – Mount Barker, Nairne | Opened 15 August 2016 | |
| Murray Bridge | Callington | 45.7 | 28.4 | Callington Road – Callington | |
| Monarto South | 54.2 | 33.7 | Ferries McDonald Road – Monarto Zoological Park | ||
| White Hill | 63.5 | 39.5 | Ramps to/from Adelaide only | ||
| Murray Bridge | 74 | 46 | |||
| 74 | 46 | continues over Swanport Bridge to Tailem Bend | |||
|
|||||
Gallery[edit]
-

Portal of the Heysen tunnel on the revamped freeway.
-
Driving towards Murray Bridge on Adelaide–Crafers Highway.
-

Adelaide–Crafers Highway on a foggy day.
-

Adelaide–Crafers Highway at Crafers.
-
Eagle on the Hill is directly above the tunnel entrance, with the old road winding round from Devil's Elbow.


See also[edit]
- Highway 1 (Australia)
- Highway 1 (South Australia)
- Highways in Australia
- Highways in South Australia
- Freeways in Australia
- Freeways in South Australia
- Metropolitan Adelaide Transport Study
References[edit]
- ^ "Old and New Road Names". City of Burnside. 8 March 2006. Retrieved 14 July 2007.
- ^ "The Adelaide Crafers Highway Project". Government of South Australia, Department for Transport, Energy and Infrastructure. 13 August 2004. Archived from the original on 29 August 2007. Retrieved 14 July 2007.
- ^ Jensen Planning and Design (December 2008). "Existing Land Use". MONARTO SOUTH INTERMODAL AND LAND USE STUDY Final Report (PDF) (Report). Monarto Common Purpose Group. p. 40. Retrieved 18 July 2014.
- ^ "Bald Hills Road Interchange". Department of Planning, Transport and Infrastructure. 16 July 2014. Retrieved 18 July 2014.
- ^ Nankervis, David (15 July 2014). "Watch how the new Mt Barker freeway interchange at Balds Hill Rd will work". The Advertiser. News Limited. Retrieved 18 July 2014.
- ^ Jamie Briggs (1 April 2015). "Joint Media Release - Briggs/Mullighan - Delivering the full Bald Hills Road interchange - Wednesday, 1 April 2015" (Press release). Retrieved 1 April 2015.
- ^ "New Freeway Interchange Bald Hills Road". Mount Barker District Council. Retrieved 3 September 2016.
- ^ "Horrific South Eastern Freeway truck crash claims second life in Adelaide". Archived from the original on 2014-08-22. Retrieved 2 April 2015.
- ^ Google (15 January 2014). "South Eastern Freeway" (Map). Google Maps. Google. Retrieved 15 January 2014.
- ^ "Adelaide Hills Council" (PDF). The South Australian Government Gazette. Government of South Australia. 21 June 2001. p. 2351. No 73. Retrieved 1 April 2014.